Kubernetes made easy with AWS EKS
Overview
Kubernetes
Kubernetes (K8s) is an open-source system for automating deployment, scaling and management of containerized applications.
Some of the key features of Kubernetes are:
- Automated rollouts and rollbacks
- Storage orchestration
- Service discovery and load balancing
- Self-healing
- Secret and configuration management
- Horizontal scaling
AWS EKS
Amazon Elastic Kubernetes Service (Amazon EKS) is a managed Kubernetes service to run Kubernetes in the AWS cloud.
Amazon EKS automatically manages the availability and scalability of the Kubernetes control plane nodes responsible for scheduling containers, managing application availability, storing cluster data, and other key tasks. With Amazon EKS, you can take advantage of all the performance, scale, reliability, and availability of AWS infrastructure, as well as integrations with AWS networking and security services.
Create EKS Cluster & Node Groups
We will be trying to setup an EKS cluster on AWS using the following tools:
- AWS CLI - AWS Command line interface
- EKSCTL - The official CLI for Amazon EKS.
Pre-requisites
- AWS Account with IAM user having access keys.
- AWS CLI installation - Verify installing using aws --version
- eksctl installation - Verify installation using eksctl version (link)
- kubectl installation - Verify installation using kubectl version
- aws configure - run this command to initialize your cli and choose the region, access keys etc
Source code
Installation Steps:
An Amazon EKS cluster consists of two primary components:
- The Amazon EKS control plane
- Amazon EKS nodes that are registered with the control plane
The EKS nodes can we setup using EC2 worker nodes as well as in a serverless fashion using Fargate profiles. In this example, we focus on using EC2 worker nodes.
Step 1 - Cluster Creation
Create the EKS Cluster with the following command:
(Note: It normally takes around 10-15 mins to create the cluster)
# Create Cluster
eksctl create cluster --name=eksdemo-mathema \
                      --region=eu-central-1 \
                      --zones=eu-central-1a,eu-central-1b \
                      --without-nodegroup

# Get List of clusters
eksctl get cluster Output:
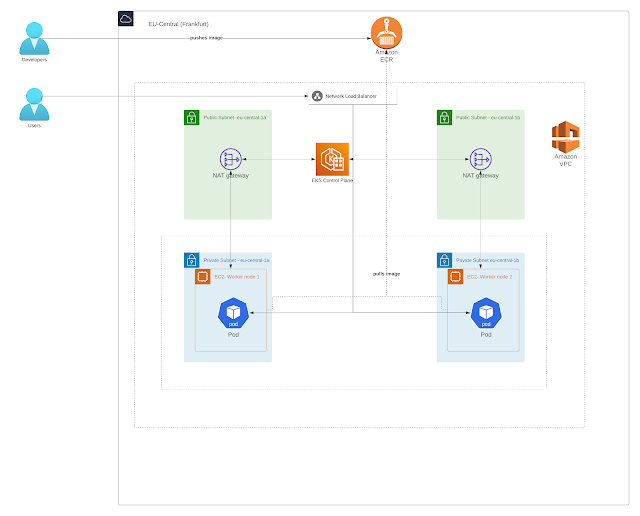
The above command will create the following artifacts:
- VPC with following components:
- Public & Private Subnets
- Internet gateway
- NAT Gateway
- Route tables
- Subnets
- Security Groups
- EKS Control plane - The Amazon EKS control plane consists of control plane nodes that run the Kubernetes software
- IAM Roles & Policies
Step 2 - Create & Associate IAM OIDC Provider for our EKS Cluster
To enable and use AWS IAM roles for Kubernetes service accounts on our EKS cluster, we must create & associate OIDC identity provider
# Template
eksctl utils associate-iam-oidc-provider \
    --region region-code \
    --cluster <cluter-name> \
    --approve

# Replace with region & cluster name
eksctl utils associate-iam-oidc-provider \
    --region eu-central-1 \
    --cluster eksdemo-mathema \
    --approve
Step 3 - Create Node Group with additional Add-Ons in Private Subnets
Now that we have the cluster setup, the next step is to setup the worker nodes. The worker nodes can be setup to be accessible privately or publicly. In case of public access, you can setup a key pair to access the worker nodes via SSH.
Private nodes will not be accessible via the internet, but the EKS cluster will communicate with the private nodes via the VPC. In the example below, we will be setting up private worker nodes.
(Note: It normally takes around 4-5 mins for this operation)
 Create Private Node Group
eksctl create nodegroup --cluster=eksdemo-mathema \
                       --region=eu-central-1 \
                       --name=eksdemo-mathema-ng-private1 \
                       --node-type=t3.medium \
                       --nodes=2 \
                       --nodes-min=2 \
                       --nodes-max=4 \
                       --node-volume-size=20 \
                       --managed \
                       --asg-access \
                       --external-dns-access \
                       --full-ecr-access \
                       --appmesh-access \
                       --alb-ingress-access \
--node-private-networkingOutput:
- Managed Nodegroup:
- EC2 instances
- Auto scaling group
- IAM roles & policies
Step 4 - Verify Cluster & Nodes
The EKS cluster and worker nodes are now available to use. We can quickly try to access the cluster and nodes with the following commands:
# Update kubeconfig manually
aws eks --region eu-central-1 update-kubeconfig --name eksdemo-mathema

# List EKS clusters
eksctl get cluster

# List NodeGroups in a cluster
eksctl get nodegroup --cluster=eksdemo-mathema

# List Nodes in current kubernetes cluster
kubectl get nodes -o wide

# Our kubectl context should be automatically changed to new cluster
kubectl config view --minify
Step 5 - Deploy Application
We now showcase how to deploy our Spring Boot based Java application from your local machine to the Kubernetes cluster:
- Navigate to the root folder and build application locally using maven with the command
mvn clean install -DskipTests=true. - Dockerize the application using the command: docker build -t eks-demo .
- Navigate to AWS Console->ECR and create a private repository eks-demo in the eu-central-1 region
- Login to the ECR registry with the following command :
aws ecr get-login-password --region eu-central-1 | docker login --username AWS --password-stdin <customer id>.dkr.ecr.eu-central-1.amazonaws.com/eks-demo
You can get this command from selecting the ecr repo from AWS console and then clicking on view push command button. Replace the <customer id> with your AWS customer id.
5. Tag the docker image :
docker tag eks-demo:latest <customer id>.dkr.ecr.eu-central-1.amazonaws.com/eks-demo:latest
6. Push The image:
docker push <customer id>.dkr.ecr.eu-central-1.amazonaws.com/eks-demo:latest
7. Deploy the image to the Kubernetes cluster by navigate to the Kubernetes artifacts folder and run the following command:
Replace the image in the deployment.yaml with the image repo from step 6.
kubectl apply -f deployment.yaml
kubectl apply -f loadbalancer-service.yaml
The above commands will deploy the application as well as expose the application via a network load balancer . The load balancer normally takes few minutes to get provisioned. You can check the status of the same on the AWS Console.
You can get the DNS name of the Load balancer from the AWS Console, and you can then access the application using the following link:
<Load balancer DNS Name>/swagger-ui.html

Step 6 - Container Insights (Optional)
With Container insights, you can redirect container logs to Cloudwatch.
Container insights help you to collect, aggregate, and summarize metrics and logs from your containerized applications and microservices
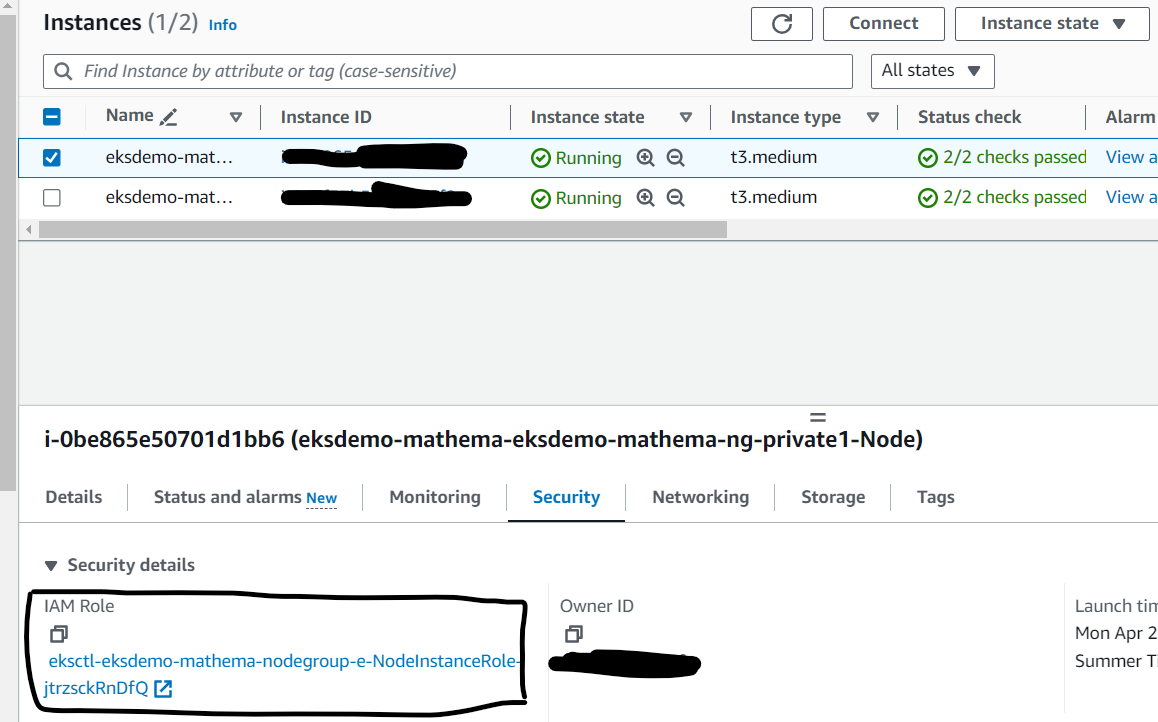
As part of the cluster creation, a role will be assigned to your EKS Cluster worker nodes.
You can find out the role by navigating to the EC2 Instances, select one of the Ec2 instances created as part of the above steps, then navigate to the security tab and look for something like the following:

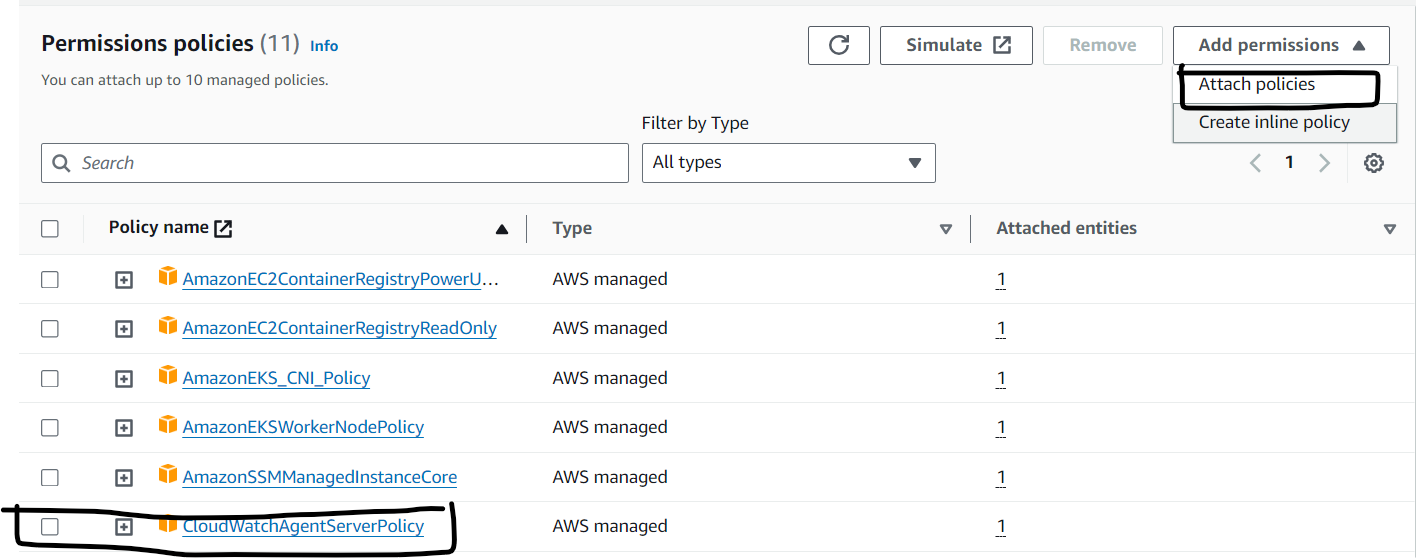
- Assigning CloudWatchAgentServerPolicy Policy
Select the IAM Role -> Click on that role Associate Policy: CloudWatchAgentServerPolicy

- Download and edit container insights resource creator
Replace {{cluster_name}} with your cluster name (eksdemo-mathema) and Replace {{region_name}} with your region name(eu-central-1) and save the file as container_insights_fluent_d.yaml
- Create Daemon sets using the command: kubectl apply -f container_insights_fluent_d.yaml
You will start observing your Kubernetes logs streamed to Cloud watch.
Step 7 - Clean up
- Delete load balancer related services
kubectl delete service expense-service-api
kubectl delete deployment expense-service-api
- Delete CloudWatchAgentServerPolicy
On AWS Console ,Go to Services -> EC2 -> Worker Node EC2 Instance -> IAM Role delete CloudWatchAgentServerPolicy
- Rollback all manual changes, like changes to Security group, adding new policies etc.
- Delete Node group
eksctl delete nodegroup --cluster=eksdemo-mathema --name=eksdemo-mathema-ng-private1 --disable-eviction
Navigate the progress of the stack deletion using AWS Console-> Cloud Formation.
Proceed to next step only if the stack is removed.
- Delete Cluster
eksctl delete cluster --name=eksdemo-mathema
Pricing

- Load balancer and other components have their own pricing
- Network data coming in and out will also have its price
References
- EkSCTL: https://eksctl.io/
- AWS EKS: https://docs.aws.amazon.com/eks/latest/userguide/getting-started-console.html
- Kubeclt & Kubernetes Cheat sheets: https://kubernetes.io/docs/reference/kubectl/cheatsheet/
- Udemy course: https://www.udemy.com/share/103mNs3@EUuofX9N0-C_oZxMpS81ASRlLYuQ5SZRbjvXVb8givr0f_i42BOSpwRrqMicrm0K/
Prashant Hariharan is an AWS certified Team Lead at MATHEMA GmbH. He specializes in Architecting and Developing Enterprise applications and cloud based applications.


